Saturday, December 1, 2012

Quick Drupal Development and Prototyping

How do you do quick Drupal development testing and prototyping?

I'm a Windows power user, but I work with a lot of Linux servers.  One of my favorite ways to do quick Drupal development, testing and prototyping is to use the Bitnami Drupal stack: an Ubuntu virtual machine image that I can spawn multiple copies of and is easy and ready to go.  Drupal is already installed along with Views and a few other common modules.  Drush is also included as part of the image now.

Drupal and other required software is typically installed in the /opt/bitnami/ directories.

Check it out and I hope that some of you find it useful.  Please feel free to share your own methods in comments.

Drupal Memory Performance

Drupal has been known to be quite resource intensive, but I'm happy to hear about the improvements that are being made for Drupal 8. I just wanted to share this interesting post I found on Drupal and the PHP Memory Limit:


Why does Drupal need so much memory? Among other things, because it has a cache problem (which of course saves your database) Drupal currently likes to cache ALL views in one place, ALL fields in one place, etc. So once you get a site with many content types, fields, views, the caches become huge, and they are all loaded into your memory with each request.... [read more]

Thursday, November 1, 2012

Creating an iCal Feed for a Single Node in Drupal 7

Here are updated instructions on how you can create an iCal Feed for a single node in Drupal 7 with the new Date iCal module. The functionality to create iCal Feeds has been separated from the Drupal Calendar module to the Date iCal module.
  1. Create a Block View for the content type(s) that you want to create the iCal Feed.  Keep in mind that this block needs to be put on your node page, so make sure that your block contains items that you would like to display on the node page.

    Here is a sample of the end result:

     
  2. Views will force you to display at least one field.  If you want an empty block with just the iCal feed, you can use the Global: Custom Text as your Field.  Hide the label and leave the text box empty.


  3. Add a Contextual Filter of Content: Nid to your Block view.


  4. Set up the Contextual Filter so that it gets the default value of Content ID from URL.  This way, your iCal Feed will only show information for the node that is loaded on the page.


  5. Now add a Feed to your View and configure it to display iCal Feeds.

  6. Don't forget to add the fields that you want included in your iCal feed...

  7. ... and add a Path to the Feed view.  Make sure it ends in .ics.
    (Edited: Dec 1, 2012 - thanks to @derekw from the Drupal.org for correcting this.) Add a wildcard placeholder for Views to use/insert the nid into.  For example, your path might be events/%/ical.ics.
    You will also need to attach the feed view to the Block that you created earlier.

  8. Once you save the view, you can place your empty block with the attached iCal feed on every node page.  The results should be like that illustrated in step 1.

Tuesday, October 2, 2012

Views Attachment in Drupal 7

I've seen answered a few questions on Stackoverflow and the Drupal StackExchange on creating a View with attachment.  Here's how to do it in Drupal 7....

When to use a Views Attachment


Perhaps you'd like to show a block of a particular type of content like News in a side bar of your webpage.  You already know that you can easily create a list of the top 5 News items (title only) using Views.  But what if you want the first News item to show the news article image in addition to the title?

Or perhaps you want to display a list of your blog posts and for the first 2 posts, you want to show the title and a summary.  But you also want to list the title of another 4 posts below that.  

This is where Views attachment comes in.  With Views attachment, you can create one View display and attach a another View display with different configuration (eg. different fields of the content type displayed).  And you can refer to both displays using the one View.

Breakdown of one block created using Views with an Attachment display.

Creating a View with an Attachment


I assume you know how to create a basic View so I'll skip the step-by-step of creating the initial View.  Here's what my initial block View might look like.  Note that I'm only showing the Title of my News article and I've set the view to skip the first News article (Pager options' Offset = 1) because I want to show the first article a little differently.


Now, when you add a new display to this View, notice that you have the option of creating an Attachment.  Let's add an Attachment.


In the Attachment display, I can now configure a different set of fields to display, not forgetting to apply the changes only to the Attachment display as not to affect the original display I created.

Add the image field ONLY to this Attachment display.

The Image field added.


Notice that the middle column of your Views display settings are the Attachment settings.  For the Attachment that I created above, I've set it to attach to the Block which I created initially and I've set the Attachment to be positioned before the block because I want the News item with the Image displayed first, on the top.

I've also set the the Pager settings to only display one item.  Remember in the Block display, I set the offset to 1 in order to exclude the first item from the Block. This is where I'm going to display the first item with an Image.


Now, if we save the View created above, you should get one Block that you can place in your site which contains both News listings with an Image and a title and News listings with just the title like this....

ONE block with two displays
one display with image and title
and  one display of title only.

Note that there are likely other ways of achieving the same thing.  For further reading, see:

Friday, July 13, 2012

How to Create a Custom Ubercart Payment Gateway

If you're looking to create your own Ubercart payment gateway for payment processing on a site outside of Drupal (eg. redirect to an external payment site like PayPal or Moneris hosted checkout), then hopefully the following instructions will help you get started...

Step 1: Create your payment gateway module's .info file and start a blank .module file.

Step 2: Define the gateway in your .module file:

define('MY_PAYMENT_GATEWAY_URL', 'https://test.MyMerchantGateway.com');

function my_pay_gateway_uc_payment_gateway() {
  $gateways['my_pay_gateway'] = array(
    'title' => t('My Payment Gateway'),
    'description' => t('Process payments through my custom payment gateway'),
  );
  return $gateways;
}

Step 3: Then you must provide a payment method:

function my_pay_gateway_uc_payment_method() {
  $methods[] = array(
    'id' => 'my_pay_credit',
    'name' => t('My Payment Gateway'),
    'title' => t('My Payment Gateway'),
    'desc' => t('Pay through my payment gateway'),
    'callback' => 'my_payment_method',
    'redirect' => 'my_payment_form',
    'weight' => 1,
    'checkout' => TRUE,
  );
  return $methods;
}


Later, when you enable your payment gateway module, you will be able to find the payment method you defined and get to the settings form in your store's payment configurations:

Your payment gateway method.

Step 4: In the callback method, you should define the settings form for your payment gateway:

function my_payment_method($op, &$order) {
  switch ($op) {
    case 'settings':
      $form['my_payment_gateway_username'] = array(
        '#type' => 'textfield',
        '#title' => t('Username'),
        '#description' => t('Your merchant username'),
        '#default_value' => variable_get('my_payment_gateway_username'),
      );
      $form['my_custom_checkout_label'] = array(
        '#type' => 'textfield',
        '#title' => t('Checkout button label'),
        '#description' => t('Customize the label of the final checkout button when the customer is about to pay.'),
        '#default_value' => variable_get('my_custom_checkout_label'),
        );
      return $form;
  }
}

The code above will render the following settings form:
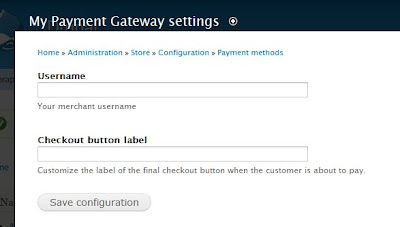
 
This is the simple form as rendered by the code above.


Step 5: Now, you have to add the form code for the redirect callback method that you specified in Step 3.

function my_payment_form($form, &$form_state, $order) {

  // Collect some information about the order
  $time = time();
  $order_id = $order->order_id;
  $order_total = number_format($order->order_total, 2, '.', '');
  $customer_email = $order->primary_email;
  $cart_id = uc_cart_get_id();

  // Build the data to send to my payment gateway
  $data = array(
    'timestamp' => time(),
    'order_id' => $order->order_id,
    'order_total' => number_format($order->order_total, 2, '.', ''),
    'customer_email' => $order->primary_email,
    'cart_id' => uc_cart_get_id(),
  );

  // This code goes behind the final checkout button of the checkout pane
  foreach ($data as $name => $value) {
    if (!empty($value)) {
      $form[$name] = array('#type' => 'hidden', '#value' => $value);
    }
  }

  $form['#action'] = MY_PAYMENT_GATEWAY_URL;
  $form['actions'] = array('#type' => 'actions');
  $form['actions']['submit'] = array(
    '#type' => 'submit',
    '#value' => variable_get('my_custom_checkout_label', t('Submit Orders')),
  );
  return $form;
}
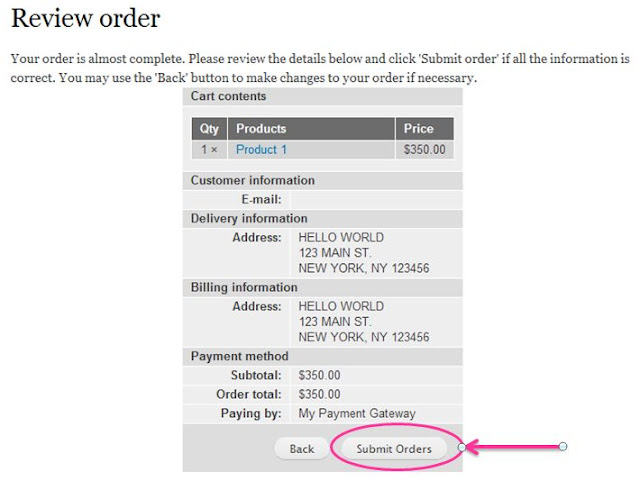
 

Code above goes behind this button

If you inspect the button element, you should see the html for the form that you built in your code including all the hidden form elements of your order data.

Step 6: Now you have to create a menu callback where you can receive confirmation from your payment gateway.

function my_pay_gateway_menu() {
  $items['paymentcomplete'] = array(
    'title' => 'Payment Complete',
    'page callback' => 'my_pay_gateway_complete',
    'access arguments' => array('access content'),
    'type' => MENU_CALLBACK,
  );
  return $items;
}

function my_pay_gateway_complete() {

  if (empty($_POST)) {
    watchdog('My Payment Gateway',
             'Received an empty or incomplete response.  Response details: @request_details',
             array('@request_details' =>  print_r($_POST,true)), WATCHDOG_ERROR);

    return 'There was a problem with your payment';
  }

  if ($_POST['status'] == 'SUCCESS') {

    // Insert logic here to make sure payment info can be matched to valid order

    // Assuming all tests passed and payment was successful
    // Complete the order
    uc_payment_enter($order_id, 'my_pay_gateway', $amount, $order->uid, NULL, $orderId);
    uc_cart_complete_sale($order, variable_get('uc_new_customer_login', FALSE));

    return 'Thank you for your purchase';
  }
}

I opted to get the returned values from my payment gateway through $_POST variable but you can also put values in the completion URL path like this:

function my_pay_gateway_menu() {
  $items['paymentcomplete/%/%'] = array(
    'title' => 'Payment Complete',
    'page callback' => 'my_pay_gateway_complete', 
    'page arguments' => array(1, 2),  
    'access arguments' => array('access content'),
    'type' => MENU_CALLBACK,
  );
  return $items;
}

function my_pay_gateway_complete($orderId, $paymentStatus) {
...
} 

If you require another example, I found it helpful to look at the PayPal payment module code.
 
Also, this post on Stackoverflow is a great example of an alternative way for Step 6.

Wednesday, July 11, 2012

Introduction to Using Drupal Cache

For anyone that stumbles on my site, I thought I would share this helpful article from Lullabot on A beginner's guide to caching data in Drupal 7.  I found it both interesting and useful.  I hope that it will be enlightening to you as well.

Building complicated, dynamic content in Drupal is easy, but it can come at a price. A lot of the stuff that makes a site engaging can spell 'performance nightmare' under heavy load, thrashing the database to perform complex queries and expensive calculations every time a user looks at a node or loads a particular page.
...because page level caching is an all-or-nothing affair, it only works for the standardized, always-the-same view that anonymous users see when they arrive.
Eventually there comes a time when you have to dig in to your code, identify the database access hot spots, and add caching yourself. Fortunately, Drupal's built-in caching APIs and some simple guidelines can make that task easy.


Monday, July 9, 2012

List Related/Similar Nodes using Views 3

Want to show a list of related or similar nodes in a block on the current node's page?   All you need is Views.

These instructions will help you create a View of related nodes (based on shared taxonomy terms) in order of relevance.  Nodes that share more terms with the current node are shown at the top of the list.  For example, if you have a node IPhone 4S node with terms Gadget, Apple, and Phone, you can get similar nodes in the following order:

IPhone 3 (Apple, Gadget, Phone)
IPad (Apple, Gadget, Tablet)
Mac (Apple, Computer)
Bramley (Apple, Fruit, Tree)

To create the View:
  1. Create a block view
  2. Add Contextual filter -> Content: Nid -> Provide default value -> Content ID from URL
  3. Add Relationship -> Content: Taxonomy terms on node -> specify the appropriate vocabulary
  4. Add Relationship -> Taxonomy term: Content using vocabulary as specified above -> Check off Require this relationship
  5. Turn on Views aggregation
  6. Assuming you are listing title only, edit the title field to use the Relationship you set up in #4 above.
  7. Add new sort criteria of Content: Nid. In aggregation settings, select Count. Use relationship from #4 and sort descending
  8. Add Contextual filter -> Content: Nid -> Use relationship from #4 -> Provide default value - Content ID from URL -> Scroll down and expand "More" then check "Exclude" to remove current node from the view
Created with Drupal 7, Views 7.x-3.3 -- Click to enlarge

Credits: From my answer on Stackoverflow