Step 1: Create your payment gateway module's
.info file and start a blank .module file.Step 2: Define the gateway in your
.module file:define('MY_PAYMENT_GATEWAY_URL', 'https://test.MyMerchantGateway.com');
function my_pay_gateway_uc_payment_gateway() {
$gateways['my_pay_gateway'] = array(
'title' => t('My Payment Gateway'),
'description' => t('Process payments through my custom payment gateway'),
);
return $gateways;
}
Step 3: Then you must provide a payment method:
function my_pay_gateway_uc_payment_method() {
  $methods[] = array(
    'id' => 'my_pay_credit',
    'name' => t('My Payment Gateway'),
    'title' => t('My Payment Gateway'),
    'desc' => t('Pay through my payment gateway'),
    'callback' => 'my_payment_method',
    'redirect' => 'my_payment_form',
    'weight' => 1,
    'checkout' => TRUE,
  );
  return $methods;
}
Later, when you enable your payment gateway module, you will be able to find the payment method you defined and get to the settings form in your store's payment configurations:
 |
| Your payment gateway method. |
Step 4: In the callback method, you should define the settings form for your payment gateway:
function my_payment_method($op, &$order) {
  switch ($op) {
    case 'settings':
      $form['my_payment_gateway_username'] = array(
        '#type' => 'textfield',
        '#title' => t('Username'),
        '#description' => t('Your merchant username'),
        '#default_value' => variable_get('my_payment_gateway_username'),
      );
      $form['my_custom_checkout_label'] = array(
        '#type' => 'textfield',
        '#title' => t('Checkout button label'),
        '#description' => t('Customize the label of the final checkout button when the customer is about to pay.'),
        '#default_value' => variable_get('my_custom_checkout_label'),
        );
      return $form;
  }
}
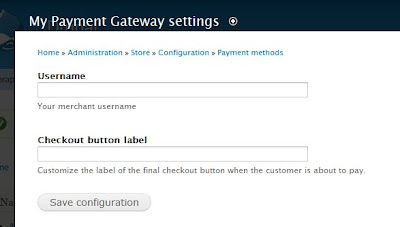
The code above will render the following settings form:
 |
| This is the simple form as rendered by the code above. |
Step 5: Now, you have to add the form code for the redirect callback method that you specified in Step 3.
function my_payment_form($form, &$form_state, $order) {

  // Collect some information about the order
  $time = time();
  $order_id = $order->order_id;
  $order_total = number_format($order->order_total, 2, '.', '');
  $customer_email = $order->primary_email;
  $cart_id = uc_cart_get_id();

  // Build the data to send to my payment gateway
  $data = array(
    'timestamp' => time(),
    'order_id' => $order->order_id,
    'order_total' => number_format($order->order_total, 2, '.', ''),
    'customer_email' => $order->primary_email,
    'cart_id' => uc_cart_get_id(),
  );

  // This code goes behind the final checkout button of the checkout pane
  foreach ($data as $name => $value) {
    if (!empty($value)) {
      $form[$name] = array('#type' => 'hidden', '#value' => $value);
    }
  }

  $form['#action'] = MY_PAYMENT_GATEWAY_URL;
  $form['actions'] = array('#type' => 'actions');
  $form['actions']['submit'] = array(
    '#type' => 'submit',
    '#value' => variable_get('my_custom_checkout_label', t('Submit Orders')),
  );
  return $form;
}
 |
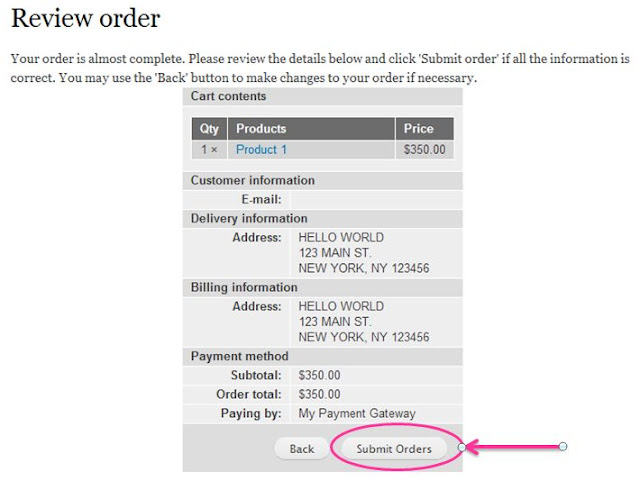
| Code above goes behind this button |
If you inspect the button element, you should see the html for the form that you built in your code including all the hidden form elements of your order data.
Step 6: Now you have to create a menu callback where you can receive confirmation from your payment gateway.
function my_pay_gateway_menu() {
  $items['paymentcomplete'] = array(
    'title' => 'Payment Complete',
    'page callback' => 'my_pay_gateway_complete',
    'access arguments' => array('access content'),
    'type' => MENU_CALLBACK,
  );
  return $items;
}

function my_pay_gateway_complete() {

  if (empty($_POST)) {
    watchdog('My Payment Gateway',
             'Received an empty or incomplete response.  Response details: @request_details',
             array('@request_details' =>  print_r($_POST,true)), WATCHDOG_ERROR);

    return 'There was a problem with your payment';
  }

  if ($_POST['status'] == 'SUCCESS') {

    // Insert logic here to make sure payment info can be matched to valid order

    // Assuming all tests passed and payment was successful
    // Complete the order
    uc_payment_enter($order_id, 'my_pay_gateway', $amount, $order->uid, NULL, $orderId);
    uc_cart_complete_sale($order, variable_get('uc_new_customer_login', FALSE));

    return 'Thank you for your purchase';
  }
}
I opted to get the returned values from my payment gateway through
$_POST variable but you can also put values in the completion URL path like this:function my_pay_gateway_menu() {
$items['paymentcomplete/%/%'] = array(
'title' => 'Payment Complete',
'page callback' => 'my_pay_gateway_complete',
'page arguments' => array(1, 2),
'access arguments' => array('access content'),
'type' => MENU_CALLBACK,
);
return $items;
}
function my_pay_gateway_complete($orderId, $paymentStatus) {
...
}
If you require another example, I found it helpful to look at the PayPal payment module code.
Also, this post on Stackoverflow is a great example of an alternative way for Step 6.
